9/4/2013 Edit: Check out the latest version of the config at the following post here:
https://elgwhoppo.com/2013/09/04/pfsense-lan-party-qos-1-3-individually-limited-tcp-streams/
****
Some of you may know that although I’m an IT consultant by day, I’m also an avid PC gamer by pretty much any other time. I run a small LAN party called ForgeLAN in Northeast Ohio. Since I run the LAN out of my Church, the internet connection can be a bit of an issue. There isn’t exactly a business case to pay for a 50/10 pipe, which is a huge problem when it comes to getting 30 guys together and all sharing an itty bitty 7/1 connection, and trying to play games that require internet connectivity to play together like Starcraft II and League of Legends.
The reason I am writing this post is because nowhere could I find a plain english simple walkthrough and sample posting of sample traffic shaping configuration that would allow download traffic to use the entire link, but always prioritize gaming traffic. I tried using a couple automated native solutions like D-Link’s Gamefuel QoS on a DGL-4500 that I picked up on eBay, but there was no way to configure the port ranges and assign percentages for utilization. As a result, anytime someone was downloading from Steam the latency for gaming traffic was absolutely squeezed out, giving players almost 400 ms of latency which makes games unplayable.
Before we get started, let me be perfectly clear, I am not a pfSense expert by any means. I will simply be posting my configs and explaining what I ended up doing to make a 7/1 network connection work for a 25-30 person sized LAN, which meant throttling down HTTP and Steam downloads so that gaming traffic goes uninterrupted.
Choosing the Physical PC
First, you need to actually have an old PC that at least has 2 NICs that will be the dedicated pfSense box. This PC will be what takes the place of your router, or in my case the Dlink DGL-4500. The reason it needs 2 NICs is because you will need one to be your WAN interface, and one to be your LAN interface. The nice part is that the WAN interface can be a 10/100 link, but definitely make the LAN interface 10/100/1000. There is a way of actually using two internet modems together to loadbalance traffic between two of them, but that’s out of scope for this free post. : D You don’t even really need a hard drive in the computer you want to use, because you can boot from the pfSense CD, then restore the configuration from the web interface. Granted, you’ll lose all configuration changes if you lose power, so I’d recommend finding an older hard drive or partitioning the one you have so that configurations are committed. That way you can actually install pfSense to a disk.
Getting pfSense
If you want the official install thread, here’s the link. I have no guarantees on mine, riddled with whatever errors I happen to capture : D http://doc.pfsense.org/index.php/Installing_pfSense#pfSense_default_configuration
Download the pfsense iso from here: http://www.pfsense.org/mirror.php?section=downloads
32-Bit LiveCD: pfSense-LiveCD-2.0.2-RELEASE-i386.iso.gz
64-Bit LiveCD: pfSense-LiveCD-2.0.2-RELEASE-amd64.iso.gz
FWIW, I ran into an unexplained issue where the DNS forwarder would just stop working for no reason on 2.0.1. Nothing in the logs, nothing. So, if I were you, stick with 2.0.2.
Extract the ISO with a program like 7zip or WinRAR, and burn it to CD and boot to it. During the boot up process, if you just let it boot normally it will skip past the installation screen, but at one point shown below you can push I, which will kick off the installation portion of the boot up sequence. You can also do this later from the direct console interface using option 99.

Lets assume that you’re going to take my advice and install to a hard drive. Hit I at the screen above. Next, I arrowed down 3 times and accept the default settings,

Following my mantra of keeping it simple, I opted for the quick/easy install. If you want to choose a partition or have multiple hard drives, I’d recommend using the custom install or only having one drive connected when you perform the installation. It’ll install by default on the first drive, but still better safe than sorry.

Once finished, I installed SMP.

Now reboot and remove the CD once the boot process has started. You’ve now installed pfSense and are ready for configuration.
Configuration of pfSense
So for easy peasyness, start with all ethernet unplugged. This way you will be able to identify what network port corresponds with which port ID assignment, such as em0, sk0. In my example, I have 2 ethernet adapters em0 and em1.
Say N on the setting up VLANs now:

At this point you can either enter the interface name, or you can use auto detection. I like auto detection because then you don’t have to worry about being sure which is which, especially if you have a dual port NIC. Hit A then enter

Now, connect the ethernet adapter that you want to be the WAN interface and it will change to up. Then hit enter.

Now do the same thing with the LAN adapter:


Ready to rock. Now let’s give the LAN adapter an IP address on a private block, I like to use 10.0.0.0/24, because in my lab, the 192.168.0 subnet is actually my internal network, but for the sake of demonstration it’s acting like my WAN connection. Choose option 2, and hit enter.

2, choose LAN, enter the IP address, enter the subnet mask length, (24 = 255.255.255.0), enable DHCP, choose the range,

Choose yes for the webConfigurator protocol revert, then hit enter. Now, connect a PC either directly to the LAN port or connect the LAN port to a switch, and connect a PC in. It should have an IP address on the 10.0.0.10-254 IP range.

Cool, now we have 2 IP’d addresses, the DHCP server is set up on the LAN interface and we can connect to 10.0.0.1 with a web browser. OK, so now I have a DHCP assigned address on my machine that’s connected to the LAN port. So now we can get to the webpage of the pfSense, logging in with the default credentials of admin / pfsense.

Configuring the QoS for Gaming
Lets talk about this in theory. If you’re following along with me at this point, chances are you want the simple explanation for this, I know I did. So basically, what I wanted to set up was something like this:

So there are two steps , first I had to define “queues”, which are basically define the service, and the priority. For example, I created a games queue and specified that it should have a high percentage of bandwidth. Next I had to define firewall rules, which basically say, TCP Port 1119 for Starcraft, make sure you are in the games queue. If you look at the configs up to this point, this is what you’ll see.

We can see that there’s only two shaper interfaces with no queues on either WAN and LAN. We’ll look at what this means here in a bit.

We can also see that there are no rules if we click on Firewall > Rules, then click on the Float Tab.

We can see that there’s no rules defined.

Now let’s restore the backup of the two different configs I have uploaded, one for firewall rules, the other for shaper configuration.

The traffic shaper config backups which are versioned, are available online right here:
TrafficShaperBackup-LANPartyConfig-v1.0.xml
TrafficShaperBackup-LANPartyConfig-v1.1.xml
TrafficShaperBackup-LANPartyConfig-v1.2.xml
v1.1 Changes:
The configs included in this download are for a 7/1 internet connection with the following percentages allocated:
qPremiumGames – 60%, at least 3Mb allocated at all times for gaming
qMedium – 30% available bandwidth
qSteamDownload – 8% available bandwidth
qNerfed – 2% available bandwidth, limited to 500 packets per second. Default queue, AKA, all traffic not matching a firewall rule goes here.
v1.2 Changes:
Combined HTTP and Steam traffic queues
Changed queues to use only percentages (with the exception of internet and WAN)

Then the firewall rule backups which are versioned, are available online right here:
FirewallRulesBackup-LANPartyConfig-v1.0.xml
FirewallRulesBackup-LANPartyConfig-v1.1.xml
FirewallRulesBackup-LANPartyConfig-v1.2.xml
1.1 Changes: LoL and SC2 updates, added TCP and UDP rules. Added some additional rules.
1.2 Changes: Matching the new queue names

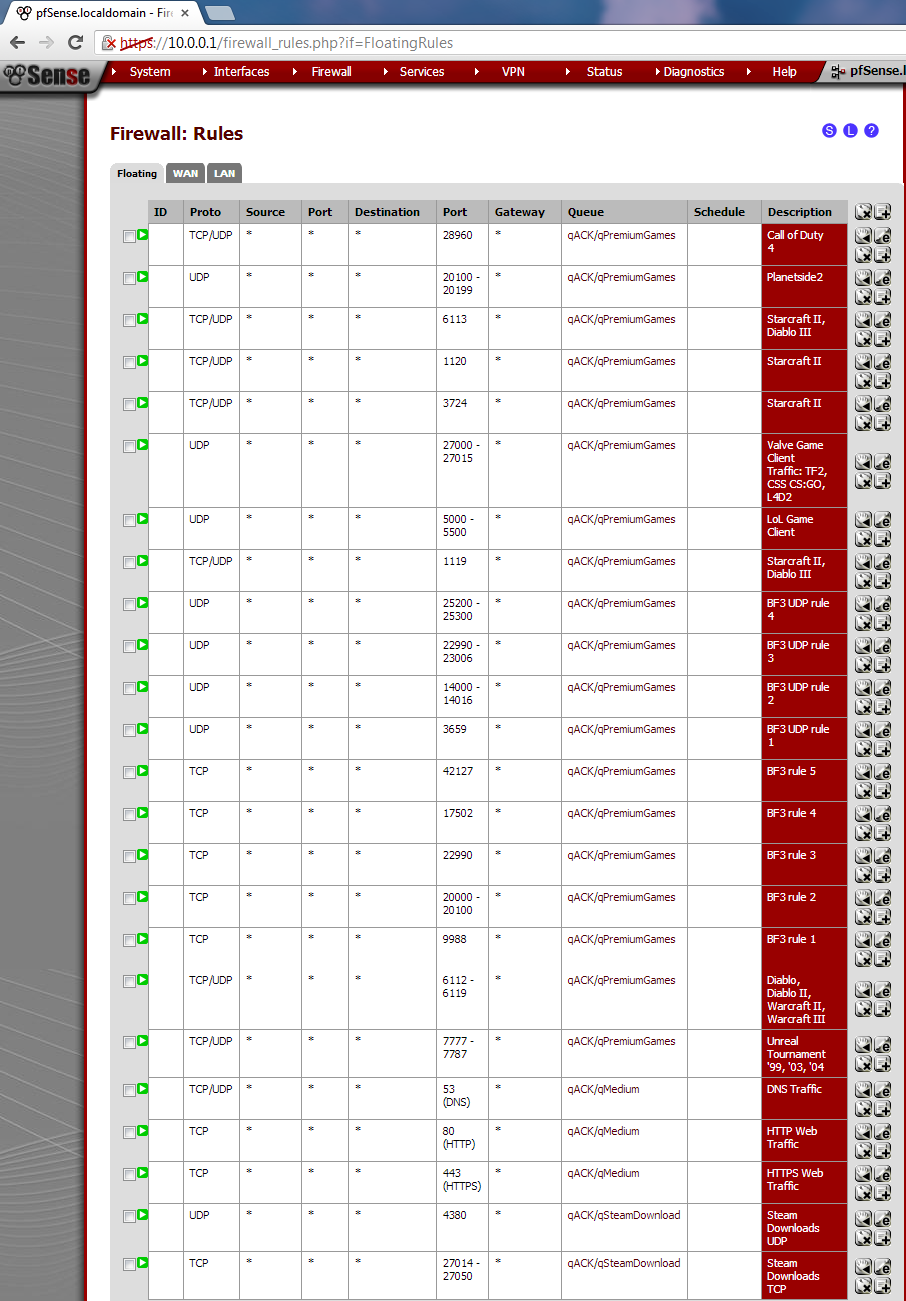
then reboot the router. If we now navigate back to the Firewall > Rules page, then click on the Floating tab, we can see that we have a lot of gaming traffic rules that I’ve pre-populated, along with HTTP and steam downloads.

Then if we click on the the Firewall > Traffic Shaper page, we can see the list of shaper queues.

The important part is now looking at what we’ve configured in these queues, as this is where the QoS really is brought into play. There are two different logical ways to order the shaping.
1. Statically setting the rates for HTTP and Steam Downloads
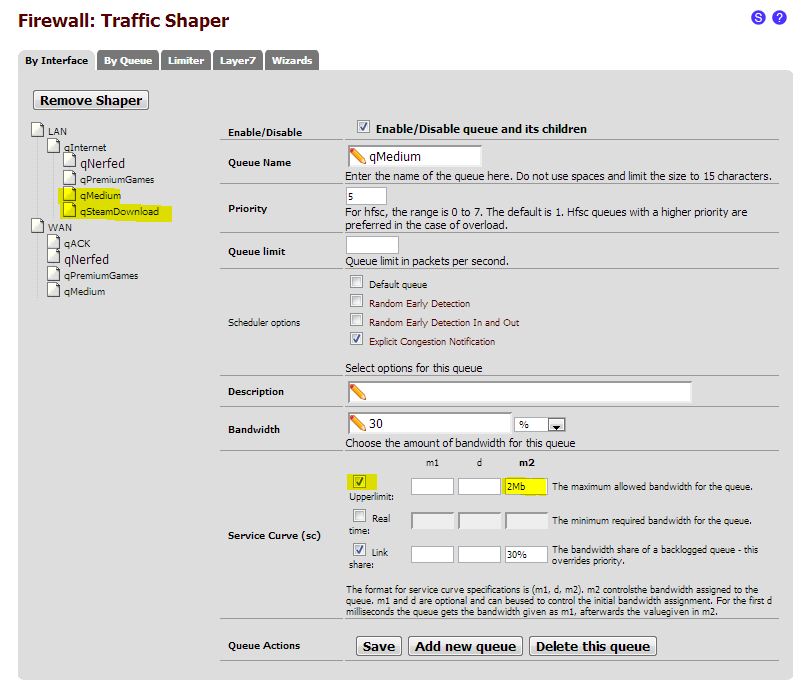
We can specifically nerf the HTTP and Steam downloads by specifying the maximum % or Mb each traffic type will get. The problem with this method is, if someone absolutely needs to download, (for example, you restore a current steam backup, but a small 70Mb download is still required) you might potentially be wasting bandwidth capping the downloads at a rate slower than otherwise could be. For example on this 7/1 internet conenction, by viewing the queues by going to Status > Queues, we can see that the http traffic is nerfed at 1.65Mb/sec, even though there’s pretty much nothing else being used. Not exactly efficient use of the bandwidth. This method is very static, and not all that flexible. But, it works very well if you can stomach inefficiency.

If you wanted to configure a static maximum for qMedium and qSteamDownload, you’d set tick the upperlimit box and set the m2 field as either 2Mb, or 30%. That way, it could never go above that static amount whether specific amount or percentage you set. This is how to do method 1.

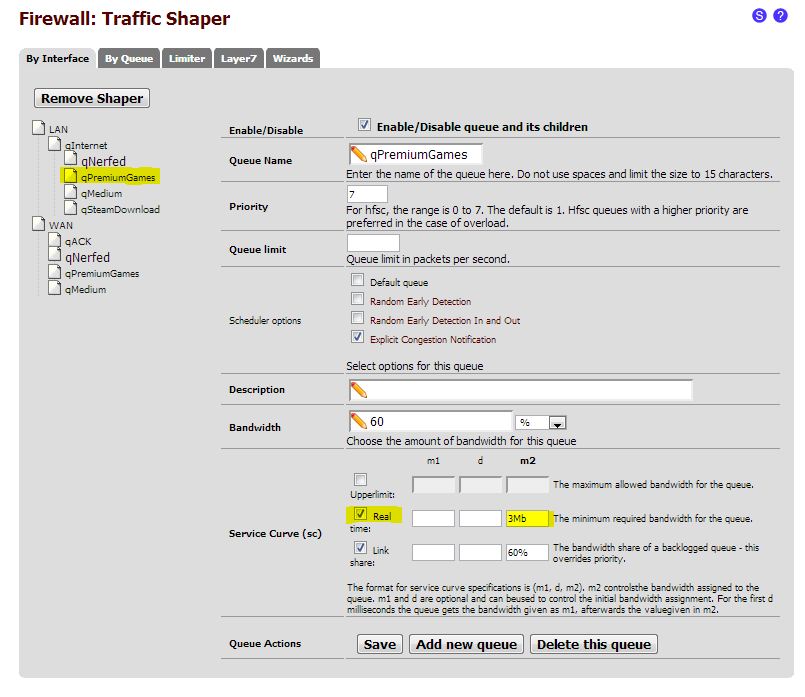
2. Guarantee the total amount of bandwidth for gaming Traffic that cannot be used for anything else.
If you wanted to configure a required minimum amount of available bandwidth for qPremiumGames, you’d set tick the real time box and set the m2 field as either 2Mb, or 30%. That way, the bandwidth allocated is set aside specifically for gaming without having to set a hard upper-limit on the other queues. This is how to do method 2.

Now, you can watch this video I made which showcases and demonstrates what happens when you have 3 computers sharing a link, one that is downloading Steam, one that is Downloading a Linux distro, and one that is trying to play PC games Team Fortress 2 and Diablo III, both with and without the traffic filtering. This video highlights method 1. I should soon be doing another video that highlights method 2.
Method 1
Using pfSense to Throttle Downloads for LAN Party Traffic from Joe Clarke on Vimeo.
Method 2