
In my old role as a vSphere administrator for a single company, we upgraded our storage from legacy spinning disk with a small amount of cache. This environment often experienced disk latency greater than 3ms on average and often time much higher than that, getting up to 20ms or higher for 30 seconds at a time, over a thousand times a day. We upgraded to a hybrid array with results of less than a millisecond latency for read and write operations…consistently.
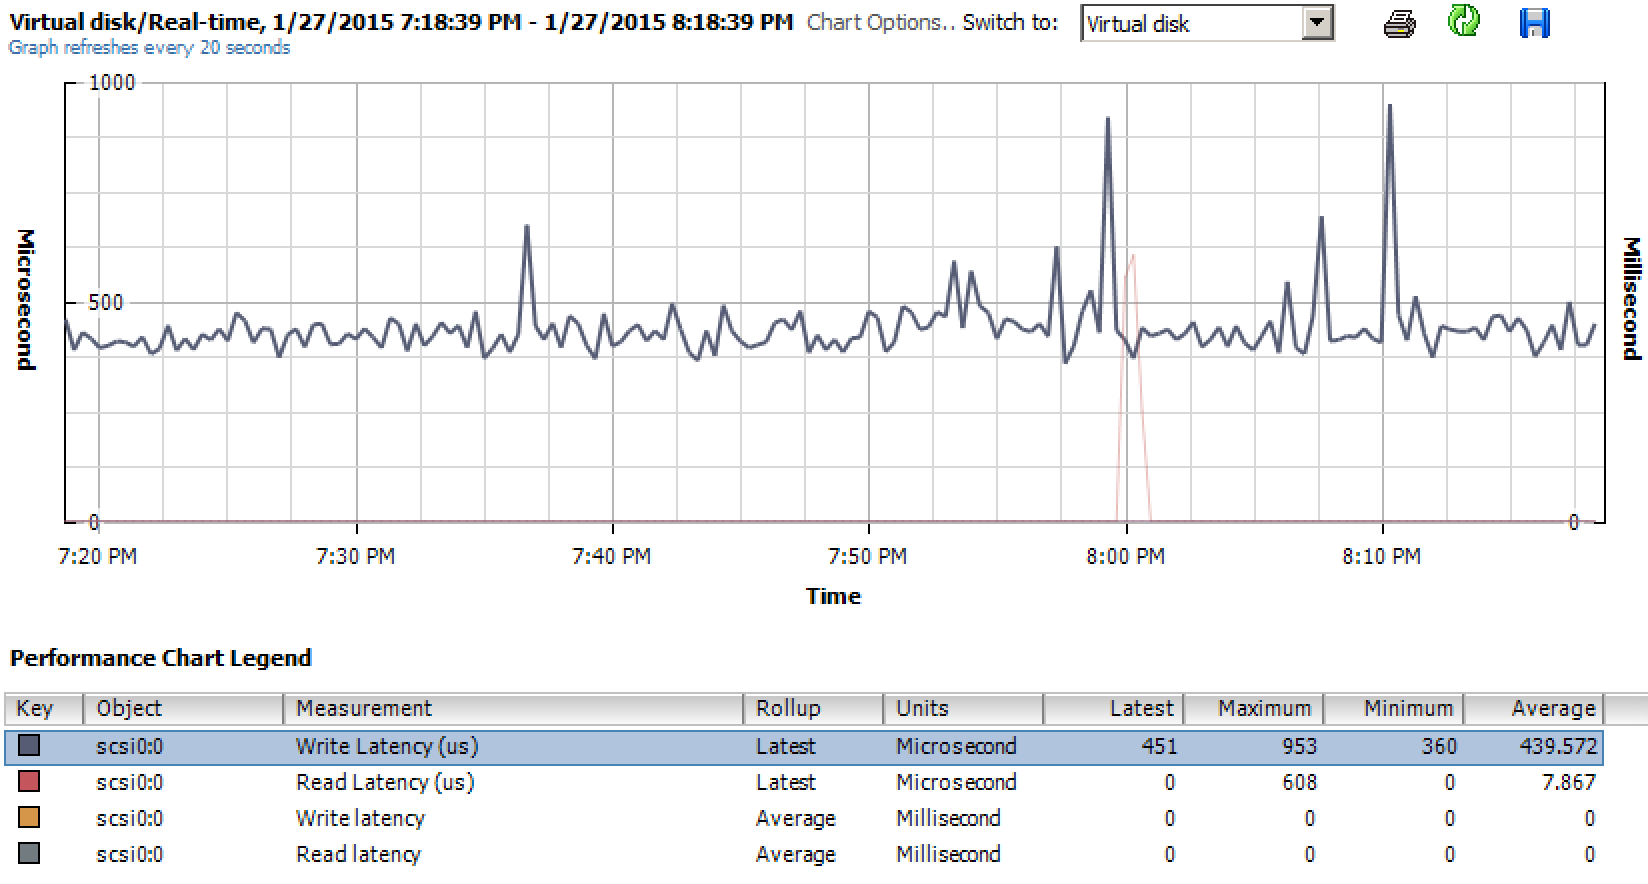
We tracked this with vCenter as well as vCenter Operations Manager. In vCenter, it’s tracked on a per virtual machine instance. We could monitor this by using the vCenter performance tab on a virtual machine and selecting Virtual Disk and monitoring the read and write latency numbers for both Milliseconds and Microseconds, as seen below.
Monitoring in vCenter was great, but it’s only available for live data, or the last hour. That doesn’t help in seeing history. We fixed this by looking into vCenter Ops and in our installation, the numbers were there. Great…history. We can now use this latency number as justification for our new storage selection.
Fast forward to my current role, as a consultant. I recently installed vRealize Operations Manager for a customer. One of the reasons was to monitor disk performance as they evaluated new storage platforms for their virtual desktop environment. As I looked into vCenter, the counters were there, but when I looked into vRealize Ops the counter wasn’t available. What gives?
After contacting my previous coworker, we compared configurations and neither one of us could figure it out. I already had a case open with VMware regarding the vRealize Ops install for an unrelated issue. On a recent call with VMware support, we compared these two vCenter/vRealize Operations manager environments. It really stumped the support engineer as well. After about five minutes, we figured it out. When vCenter Operations Manager was installed, the selection to gather all metrics was selected. vRealize Operations Manager doesn’t give you this options. Instead you need to change the policy.
Here’s How:
Log into vRealize Operations Manager, select a VM, and select the troubleshooting tab. Take a note of the policy that is effect for the VM…if you haven’t tweaked with vROPs, then the policy will be the same for all objects.

Click on this policy, this will link to the administration portion of vROPs focused on the “Policies” section.

Click on the “Policy Library” tab. Drop down the “Base Setting” group, and select the proper policy that was at the top of the virtual machine troubleshooting tab. Then click not the edit pencil.

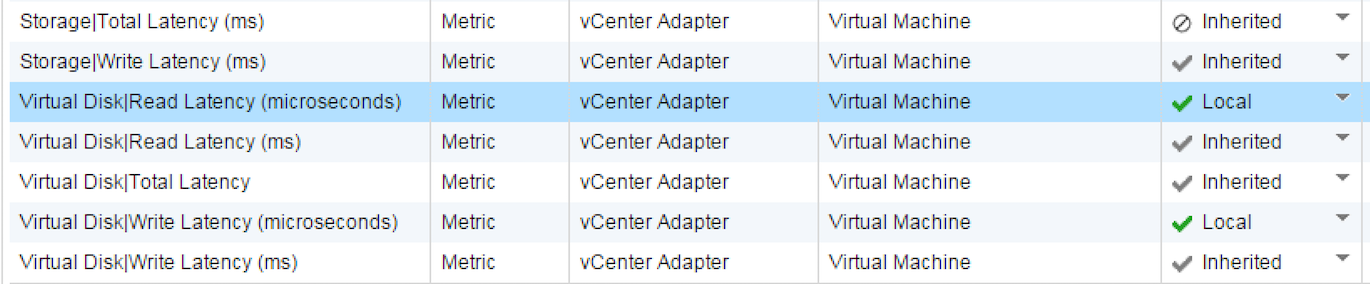
Once in the “Edit Monitoring Policy” window (shown below), limit the Object type to “Virtual Machine” and filter on “Latency”. This will reduce the object to a single page.

Change the “state” for the Virtual Disk|Read Latency (microseconds) and Virtual Disk|Write Latency (microseconds) to “Local” with a green checkmark.
After about 5 minutes, verify that the data is now displayed in vRealize Ops.

Why is this counter important?
As SSD arrays like Pure Storage and XtremIO or hybrid arrays like Tintri become more prevalent, millisecond latency numbers are near 0 and result in a single flat line and no real data, but microseconds really allows administrators to see any changes in latency that would otherwise be flattened out.
I’d like to thank El Gwhoppo for allowing me to guest author. I hope this tidbit is useful information!
