Load Balancing Horizon View with NSX

This post will explain in detail how I was able to set up NSX load balancing in a test environment and was still able to meet the requirements I had for load balancing. The requirements I had for a load balancer for Horizon View were:

  1. As simple as possible
  2. Session performance is acceptable and scalable
  3. Ability to automatically fail nodes so a reconnect gets back in less than one minute
  4. Balance Horizon View SSL, PCoIP and HTML5 Blast session traffic appropriately
  5. The entire solution must be able to leverage a single public IP address for all communication

So there are to primary ways of constructing an NSX load balancer, inline or one-armed. These drawings were borrowed from a VMworld 2014 slide deck.

in-lineone-arm

In this particular example, we opted for one armed, which means the load balancer node will live on the same network segment as the security servers.

Let’s take a look at logically how this is set up in the test lab. You may notice that I used two ports for PCoIP, 4172 and 4173. This is because I wanted to keep it as simple as possible, and with the requirement of a single IP address, keeping the PCoIP listen port for each security server separate was the easiest option. I was able to load balance and persist both 443 and 8443 with NSX, but stepped around the balancing for PCoIP and simply passed it through. In production you can just use another public IP address if you want to keep PCoIP on 4172, then just NAT it to the corresponding security server. If you need more detail on the lab setup, you can check out my previous post which has more detail on the firewall rules used.

logical-loadbalancing

General finding notes about the setup before we get into screen shots:

  • The demonstrated configuration is for external connectivity only at present, since persistence matters most when tunneled.
  • SSL passthru is utilized rather than offloading.
  • The DFW is in play here as well, and all firewall rules are in place according to to required communication.
  • In order to configure the security server to listen on 4173, I had to follow the KB and create a reghack on the box, AND configure the tunnel properly in the View GUI.
  • In order to get SSL and BLAST working together from a single VIP, I ended up needing separate virtual servers, pools and service monitoring profiles that all used the same VIP and Application profile.
  • I ended up using ssl_sessionid as the persistence type for both SSL and BLAST, and ended up using IPHASH for the load balancing algorithm.
  • I wasn’t able to configure a monitor to correctly say that 8443 was UP, instead it was in WARN(DOWN) on the 8443 monitor. I opted to simply leverage 443 as the monitor for the blast VIP, so there could potentially be a missed failover if only the blast service was down.

Let’s take a look at the configuration screen shots of the View specific load balancer edge that I used.

NSX-LB2015-09-24 23_17_41

We opted for the simple configuraiton of SSL passthrough and SSL Session ID was used for persistence.

NSX-LB2015-09-24 23_18_01

I found you had to create a separate monitor for each pool for it to function properly, not really sure why.

NSX-LB2015-09-24 23_31_03

You should be able to use the /favicon.ico to determine health as we do with other load balancers, but the plain GET HTTPS worked for me and favicon didn’t.

NSX-LB2015-09-24 23_31_16 NSX-LB2015-09-24 23_31_25

** Important, notice that no ports were specified in the server  pool, only the monitor port. That was specified only in the virtual servers below.

NSX-LB2015-09-24 23_43_47 NSX-LB2015-09-24 23_43_59

NSX-LB2015-09-24 23_45_04

NSX-LB2015-09-24 23_45_13

NSX-LB2015-09-24 23_46_20 NSX-LB2015-09-24 23_46_41

Let’s take a look at the screen shots of the View security server configuration.


ss1

ss2

If you have to make a security server listen on another port, don’t forget to change it in the registry as well as in the secure gateway URL field. Also don’t forget to let it through the firewall.

ss3

And voila! We have a working configuration. Here’s a quick demonstration of the failover time, which can be completely tuned. Of note, we only tested Blast failover, but SSL and PCoIP work just fine as well. The best part is we were able to create a COMPLETELY separate isolated and firewalled security server without even leveraging a DMZ architecture.

If you’re looking for another AWESOME post on how the NSX load balancer is utilized, I learned more from this one by Roi Ben Haim than from the pubs. Great step by step setup that helped me big time.

Horizon View and VMware NSX – Zero Trust Install

EDIT: 8/28/2016 There’s now a fling that will automatically prep rules and security groups for you. https://labs.vmware.com/flings/horizon-service-installer-for-nsx

Dave Kennedy is a netsec veteran and industry leader in the information security space, has written multiple books on the topic of penetration testing, is the founder of @TrustedSec, wrote the Social Engineering Toolkit, founded @Derbycon and on and on. Point is dude knows how to find a way in and pop a box like a boss. Check out this tweet he had not too long ago.

zero1

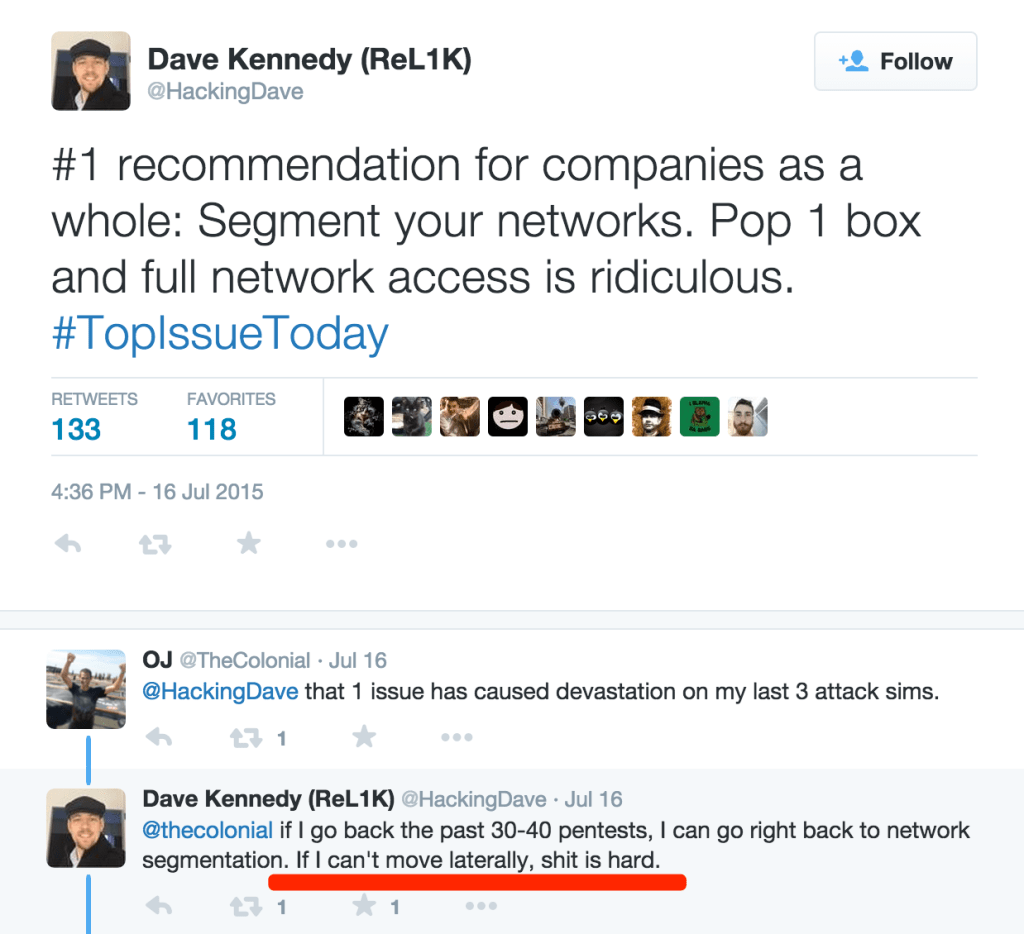
And with that red underlined statement, in my mind the micro segmentation use-case for VMware NSX speaks for itself. One of the easiest places to get access to from the outside is a user’s desktop, simply because users (often times helpdesk) can be tricked into going to a malicious website which can exploit the user’s desktop. We see this time and time again with not just email attachment, but phone spear phishing as well. Protecting the virtual desktops and servers with the DAPE model (Deny All Permit Exception) is becoming not a nice thing to have, but a near requirement for many businesses. One which security and networking teams are having a hard time doing once inside the perimeter and underneath the DMZ, especially with east west traffic inside defined networks.
It is for this reason I have been working the past few weeks on integrating NSX 6.2 and Horizon View 6.1 in my lab to implement not only zero trust desktops, but an entire zero trust hardened Horizon View Infrastructure. To me, a zero trust network infrastructure is pretty much like getting network access on a “need to have basis”. Unless specifically allowed (by policy), you’re blocked (by policy); not by traditional IP based rules. The pieces I set up in my lab include minimum functional connectivity to service the following components and services:
  • Horizon View Connection Servers
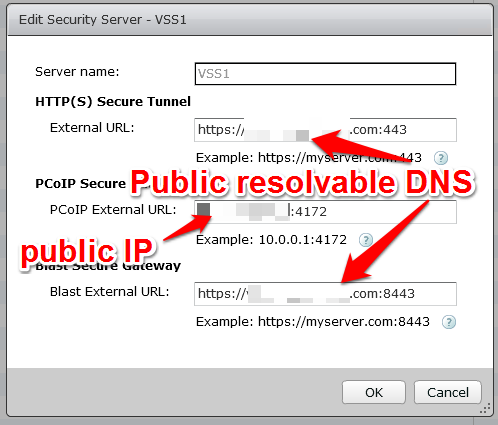
  • Horizon View Security Servers
  • Connectivity with vCenter and Horizon View Composer
  • Virtual Desktops with Identity based Firewall
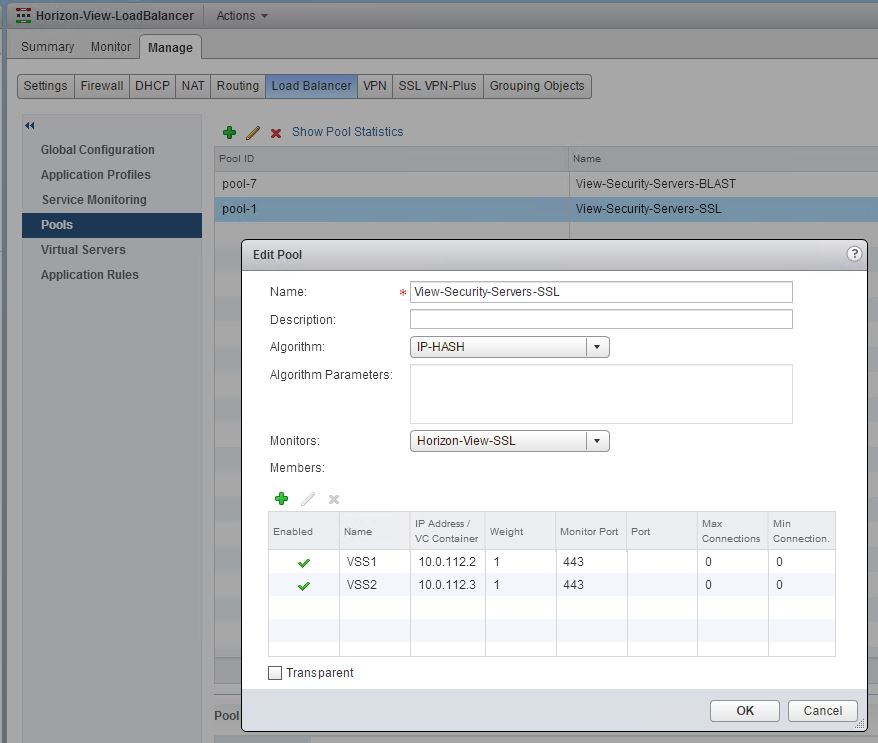
  • NSX Load Balancers (will do a separate post for this)
Let’s take a look logically at how the lab network is set up. It’s important to remember that while I set these up with NSX based logical networks for scalability, the NSX DFW (distributed firewall) does not require any NSX logical networks to function; the DFW can work just fine even with standard virtual switching because the firewall lives in the ESXi kernel.

zero2

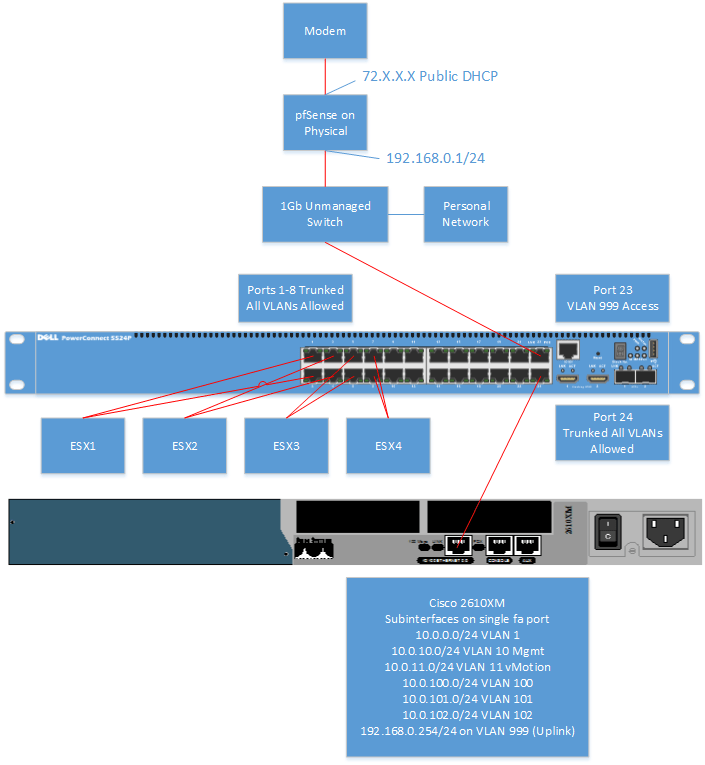
Now let’s take a look physically at how this simple lab is set up.

zero3

Now let’s talk about some of the View components and what east-west and north-south we firewall rules we conceptually need to make to create to harden the horizon environment, not including user defined rules. The below generic categories are in regards to traffic we need to concern ourselves with. Remember, we are not providing and open IP stack, rather providing only the required ports for the software to function. Most of these ports can be found at the KB which defines View connectivity requirements.
Security Server
View Security Servers <–> HTTPS, PCoIP, Blast
View Security Servers <–> Virtual Desktops
Block the rest
Connection Server
View Connection Server <–> vCenter Server
View Connection Server <–> View Replica Server
View Connection Server <–> Virtual Desktops
View Connection Server <–> AD/DNS
View Connection Server <–> View Security Server
View Connection Server <–> View Administrator Static IPs
Block the rest
Virtual Desktops
Virtual Desktops <–> AD/DNS
Dynamic User Logins <–> Specified Internal Resources over Specified protocols
Block the rest
So now that we’ve seen the categories conceptually, let’s look at the service definition and service groups that I came up with. I broke them up into three basic categories.
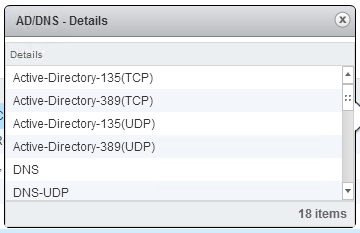
  • Active Directory/DNS
  • Horizon View
  • User Defined

Let’s take a look at the active directory rules per several microsoft KB’s and some trial and error.

Custom Active Directory Aliases (NSX individual “Services”)

services1
Custom Horizon View Aliases (NSX individual “Services”)
services2
So we can group up those services into service groups for easy clean looking rules. Let’s take a look at those.
View Connection Server <–> vCenter
servicegroup1
View Security Server <–> View Desktops
servicegroup2
Security Servers <–> Connection Servers
servicegroup3
View Desktops <–> Connection Servers
* Interesting note, at the time of writing with View 6.1.1 TCP 4002 was not a documented port requirement in the network requirements KB between desktops and connection servers and I found that it was definitely needed.
servicegroup4
servicegroup5
View Desktops <–> AD/DNS
ad1 ad2 ad3
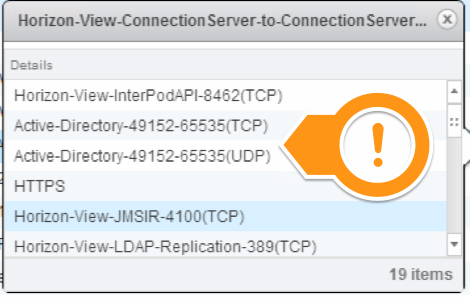
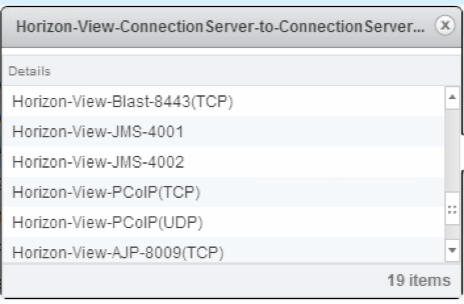
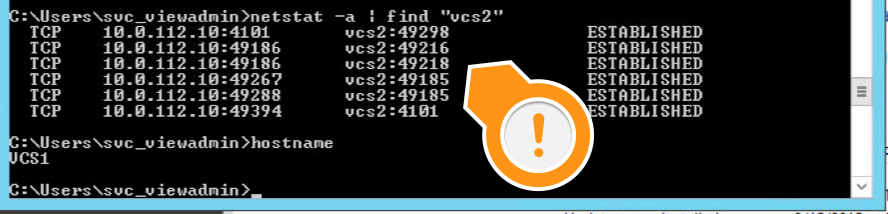
View Connection Server <–> View Connection Server
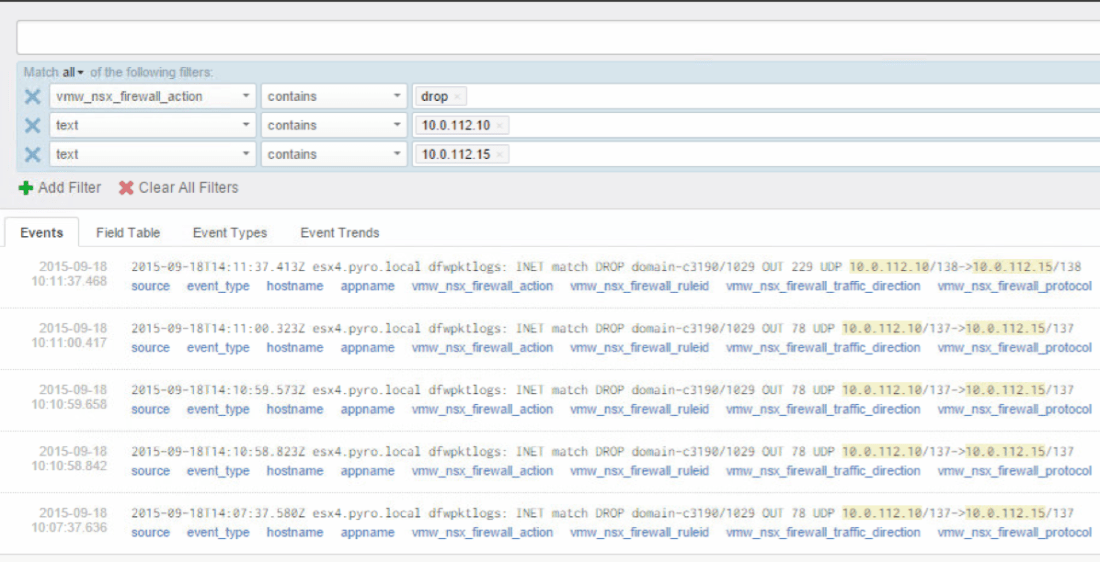
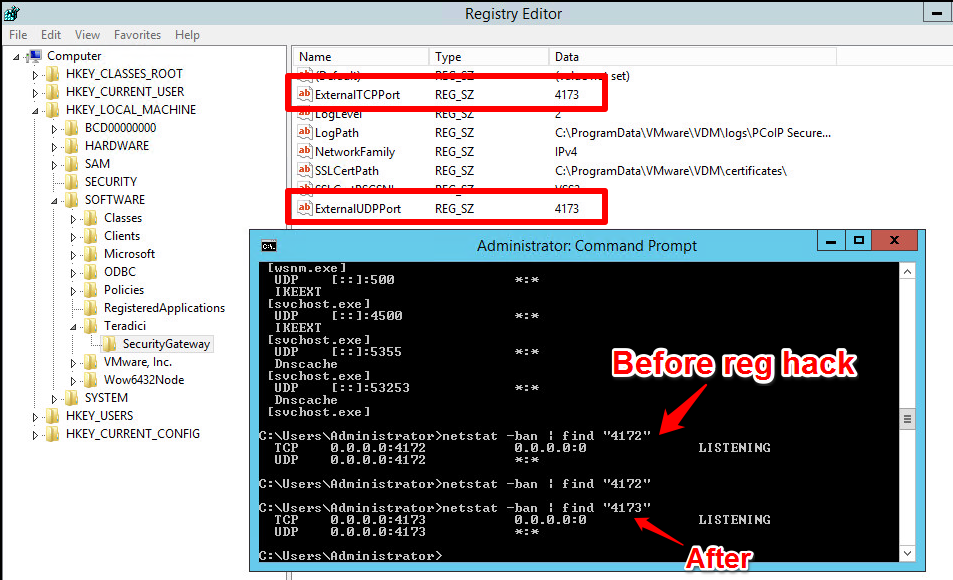
*Note that even though it’s not documented, ADAM requires the random port range. Screen shot below of the connections…
servicegroup6
servicegroup7
servicegroup8
servicegroup9
Even though they’re not documented on the network page, I found most ports for AD (ADAM) communication are required from Connection Server to Connection Server. Was able to find this when I kept banging my head during the second connection server install with Log Insight.
netstat
User Defined Security Groups
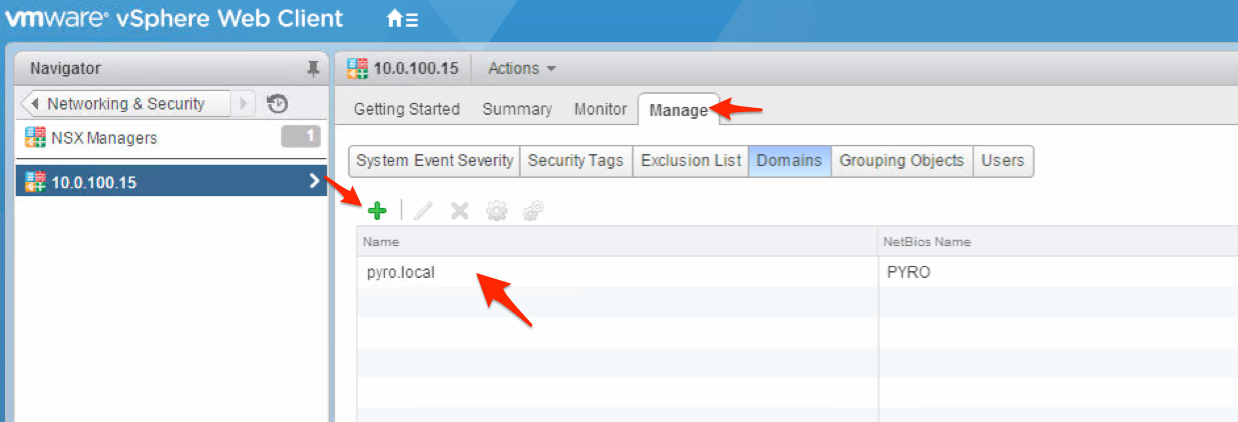
So first of all you have to integrate the NSX manager with Active directory so that you can pull users and allocate ACLs based on users in AD. Do that under the NSX manager \ Manage section and add the domain.
nsxmanager
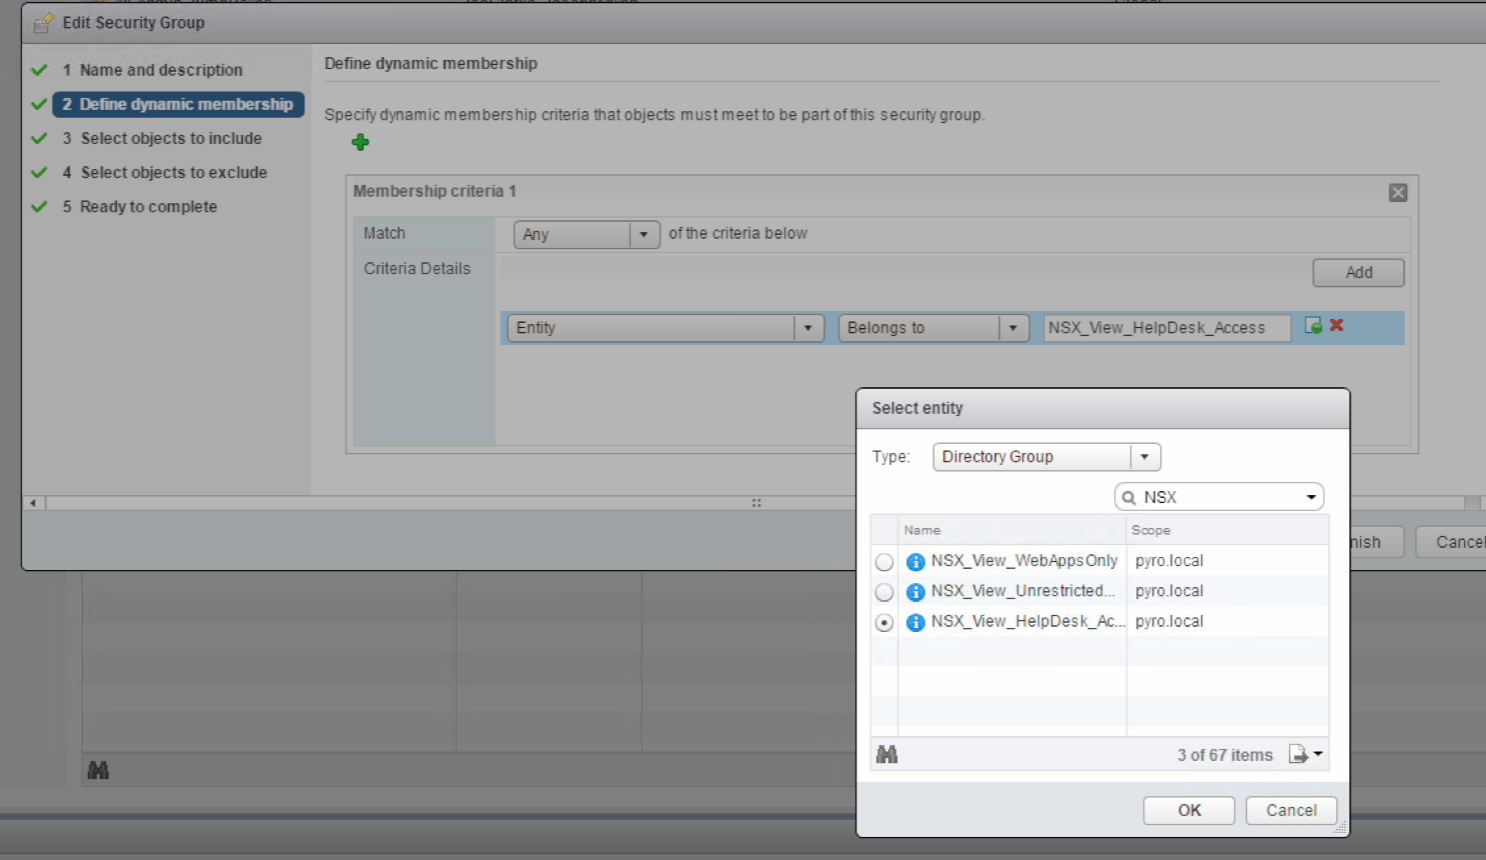
Once the domain is configured, now we can actually add users into the security groups that we’ll use in the firewall rules. Let’s look at one of the dynamic user examples we’ll go over in this post, View Helpdesk staff that need access to the view admin manager web page and the vCenter web interface, but nothing else. Go to the grouping objects then security group and make a new security group:
dynamicuser1
Then let’s pick the user group out from AD that we already selected. Note the required menus to select the user group.
nsx_dynamic_user2
And finish after excluding anything you want to make sure is always excluded from the security group, eg, domain controllers, whatever. If directory group is not an option, you need to check your domain integration from the previous step.
So now that we’ve defined the source and destination, service groups and dynamic user groups to be firewalled, let’s check out the firewall rules that tie it all together with some commentary.
Desktop_Allow_Rules
I put all the block rules last per norms of DAPE ACL ordering. We can see here that rules 1 & 2 are based on NSX_View_Helpdesk_Access has static access to a couple VMs, View, Log Insight and vCenter via HTTPS.
Most of the security groups for the desktops had dynamic membership based on VM name, such as Win7-, but other filters could be used as well such as OS Windows 7, etc.
rules1
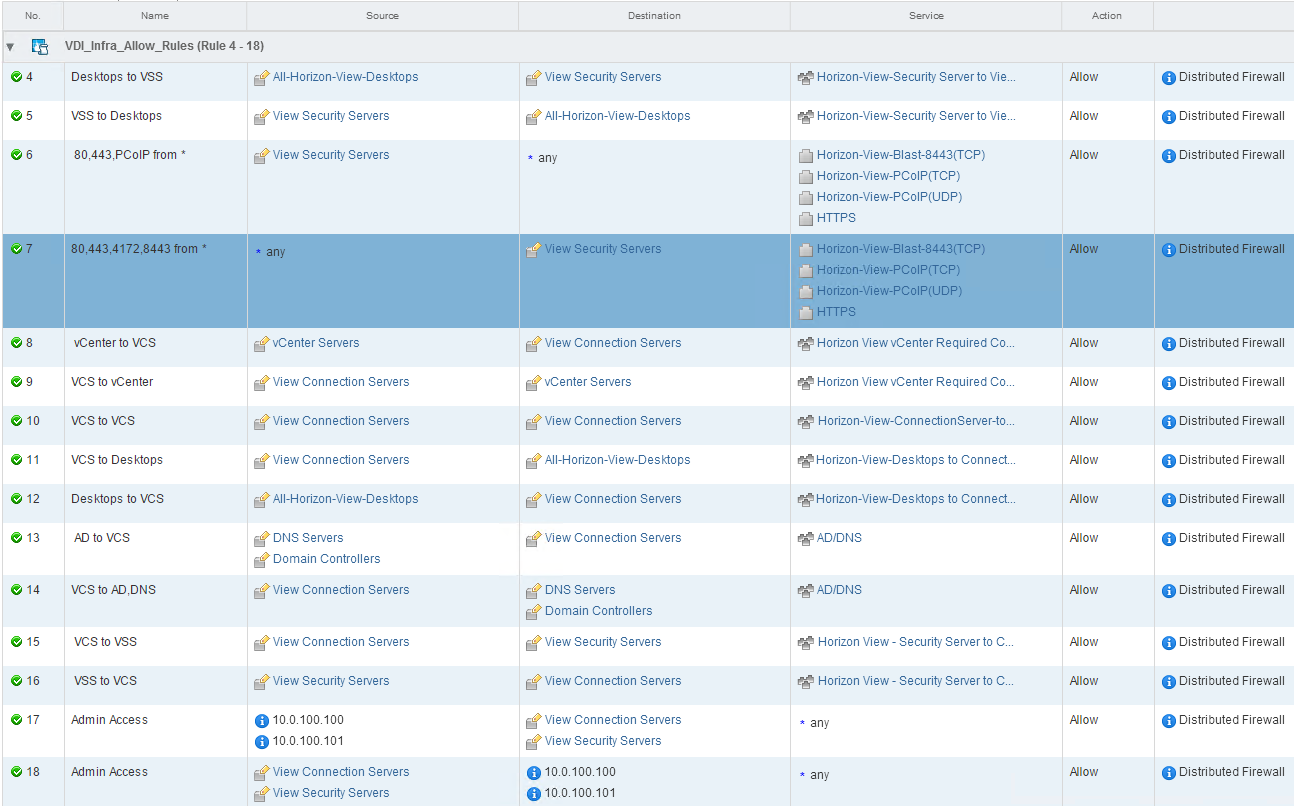
VDI_Infra_Allow_Rules
Here I specified all the required rules in and out of the VDI infrastructure, including open IP stack from a couple manually specified administrator desktop IP addresses. Notice how nobody even has access to the connection servers except the admins?
rules2
VDI_Block_Rules
These rules block any traffic in or out of either desktops or security servers unless specified above.
rules3
Results are good and as intended.
win7002
We can see that dynamically the user on the VM was picked up and the VM was added to the rule.
userdefined1
Big Picture Lessons Learned
  1. Knowledge of traffic being dropped by the DFW is paramount, otherwise you’re going to HAVE A BAD TIME, lol (Southpark anyone?). Seriously, though, you need to be able to troubleshoot and loosen ACLs for required traffic and find undocumented port requirements like I had to for View, and they have GREAT network requirement documentation. The best way I came up with to find this information quickly is to log all firewall rules, and then leverage VMware Log Insight with the NSX plugin to filter on drops (installs in like 15 minutes). Made it super simple to figure out what ports were being used between two endpoints. Flow monitoring with NSX 6.2 is another great option to use before putting the rules in place to understand different sources & destinations in play.LogInsight1
  2. With NSX 6.1.4, if VMware tools wasn’t running in the VM and vCenter didn’t know the IP address of the VM, none of the DFW rules took effect with the VM selected as the source. Now with 6.2, DFW rules apply whether or not vCenter is aware of the VM ip address. The problem was easy enough to fix with a IP subnet based block catch-all rule, but the point of policy driven access is getting away from static configurations.
  3. If you change user group membership in AD, you must resync the AD deltas from within the vSphere web client for that to take effect immediately.
  4. With NSX 6.2, there is a drop-down option when creating the firewall rules to block traffic in/out of the source destination. I found that to completely block traffic in both directions, two rules were required with source destination reversed.

I would absolutely love to give y’all an export of the rules so you could just import them, but sadly it’s not that easy to import them once the XML is exported. As soon as Tristan Todd’s rumored NSX rule import fling is available, I will post a CSV with all the Services, Service Groups and Firewall Rules so you can start with what I put together and automatically import them.

I hope this was helpful for you guys! Next up, I’ll be introducing security server load balancing with NSX, followed by AppVolumes integration, Trend Micro Deep Security AV and hopefully more.

Adding Microseconds to vRealize Operations Graphs

In my old role as a vSphere administrator for a single company, we upgraded our storage from legacy spinning disk with a small amount of cache. This environment often experienced disk latency greater than 3ms on average and often time much higher than that, getting up to 20ms or higher for 30 seconds at a time, over a thousand times a day. We upgraded to a hybrid array with results of less than a millisecond latency for read and write operations…consistently.

vCenter Performance

We tracked this with vCenter as well as vCenter Operations Manager. In vCenter, it’s tracked on a per virtual machine instance. We could monitor this by using the vCenter performance tab on a virtual machine and selecting Virtual Disk and monitoring the read and write latency numbers for both Milliseconds and Microseconds, as seen below.

Monitoring in vCenter was great, but it’s only available for live data, or the last hour. That doesn’t help in seeing history. We fixed this by looking into vCenter Ops and in our installation, the numbers were there. Great…history. We can now use this latency number as justification for our new storage selection.

Fast forward to my current role, as a consultant. I recently installed vRealize Operations Manager for a customer. One of the reasons was to monitor disk performance as they evaluated new storage platforms for their virtual desktop environment. As I looked into vCenter, the counters were there, but when I looked into vRealize Ops the counter wasn’t available. What gives?

After contacting my previous coworker, we compared configurations and neither one of us could figure it out. I already had a case open with VMware regarding the vRealize Ops install for an unrelated issue. On a recent call with VMware support, we compared these two vCenter/vRealize Operations manager environments. It really stumped the support engineer as well. After about five minutes, we figured it out. When vCenter Operations Manager was installed, the selection to gather all metrics was selected. vRealize Operations Manager doesn’t give you this options. Instead you need to change the policy.

Here’s How:
Log into vRealize Operations Manager, select a VM, and select the troubleshooting tab. Take a note of the policy that is effect for the VM…if you haven’t tweaked with vROPs, then the policy will be the same for all objects.

vRealize Policy

Click on this policy, this will link to the administration portion of vROPs focused on the “Policies” section.

vRealize Policy List

Click on the “Policy Library” tab. Drop down the “Base Setting” group, and select the proper policy that was at the top of the virtual machine troubleshooting tab. Then click not the edit pencil.

vRealize Operations Edit Policy

Once in the “Edit Monitoring Policy” window (shown below), limit the Object type to “Virtual Machine” and filter on “Latency”. This will reduce the object to a single page.

vRealize Override Attributes

Change the “state” for the Virtual Disk|Read Latency (microseconds) and Virtual Disk|Write Latency (microseconds) to “Local” with a green checkmark.

vRealize Operations Attribute Changes

After about 5 minutes, verify that the data is now displayed in vRealize Ops.

vRealize Operations Graph


Why is this counter important?
As SSD arrays like Pure Storage and XtremIO or hybrid arrays like Tintri become more prevalent, millisecond latency numbers are near 0 and result in a single flat line and no real data, but microseconds really allows administrators to see any changes in latency that would otherwise be flattened out.

I’d like to thank El Gwhoppo for allowing me to guest author. I hope this tidbit is useful information!

UCS, View, Virtual SAN Reference Architecture: Cool! But did you think about…

I really appreciate the article titled “Myth versus Math: Setting the Record Straight on Virtual SAN” as written by Jim Armstrong. He highlights some of the same points I’m going to make in this post. Virtual SAN is a very scalable solution and can be configured to meet many different types of workloads. Also he notes that reference architectures are a starting point, not complete solutions. I am a big fan of hyper-converged architectures such as Virtual SAN. I’m also a big fan of Cisco based server solutions. However, I’ve also had to correct underperforming designs that were based entirely off of reference architectures, and as such I want to ensure that all the assumptions are accounted for with a specific design.  One of the reasons I’m writing this is because I have recently delivered a Horizon View Plan and Design which included a Virtual SAN on Cisco hardware, so I wrestled with these assumptions not too long ago. The secondary reason is because this architecture utilizes “Virtual SAN Ready Nodes”, specifically as designed for virtual desktop workloads. Using this vernacular brings trust and immediate, “Oh neat no thinking required for sizing” to most, but I would argue you still have to put on your thinking cap and make sure you are meeting the big picture solution requirements, especially for a greenfield deployment.

The reference architecture that I recently read is linked below.

http://blogs.vmware.com/tap/2015/01/horizon-6-virtual-san-cisco-ucs-reference-architecture.html

http://www.cisco.com/c/en/us/solutions/collateral/data-center-virtualization/desktop-virtualization-solutions-vmware-horizon-view/whitepaper_C11-733480.pdf

Remember, reference architectures establish what is possible with the technology, not necessarily what will work in your house. Let’s go through the assumptions in the above setup now.

Assumption #1: Virtual Desktop Sizing Minimums are OK

Kind of a “duh”. Nobody is going to use big desktop VMs for a reference architecture because the consolidation ratios are usually worse. If you read this article titled “Server and Storage Sizing Guide for Windows 7 Desktops in a Virtual Desktop Infrastructure” it highlights minimum and recommended configurations for Windows 7, which includes the below table.

Win7Recommended

Some (not all) of the linked clones were configured in this reference utilize 1.5GB 1 vCPU which is below the recommended value. I’ve moved away from the concept of starting with 1 vCPU for virtual desktops regardless of the underlying clock speed, simply due to the fact that a multi-threaded desktop performs better given that the underlying resources can satisfy the requirements. I have documented this in a few previous blog posts, namely “Speeding Up VMware View Logon Times with Windows 7 and Imprivata OneSign” and “VMware Horizon View: A VCDX-Desktop’s Design Philosophy Update“. In the logon times post, I found that simply bumping from 1 vCPU to 2 reduced 10 seconds in the logon time in a vanilla configuration.

Recommendation: Start with 2 vCPU and at least 2GB from a matter of practice with Windows 7 regardless of virtual desktop type. You can consider bumping some 32 bit use cases down to 1 vCPU if you can reduce the in-guest CPU utilization by doing things like offloading PCoIP with an Apex card, or utilizing a host based vShield enabled AV protection instead of in-guest. Still, you must adhere to the project and organizational software requirements. Size in accordance with your desktop assessment and also POC your applications in VMs sized per your specs. Do not over commit memory.

Assumption #2: Average Disk Latency of 15ms is Acceptable

This reference architecture assumes from a big picture that 15ms of disk latency is acceptable, per the conclusion. My experiences have shown me that between 7ms of average latency is the most I’m willing to risk on behalf of a customer, with the obvious statement “the lower the better”. Let’s examine the 800 linked clone desktop latency. In that example, the average host latency was 14.966ms. Most often times requirement #1 on VDI projects I’m engaged on is acceptable desktop performance as perceived from the end user. In this case, perhaps more disk groups, more magnetic disks or smaller and faster magnetic disks should have been utilized to service the load with reduced latency.

Recommendation: Just because it’s a hyper converged “Virtual SAN Ready Node” doesn’t mean you’re off the hook for the operational design validation. Perform your View Planner or LoginVSI runs and record recompose times on the config before moving to production. When sizing, try to build so that average latency is at or below 7ms (my recommendation), or whatever latency you’re comfortable with. It’s well known that Virtual SAN cache should be at least 10% of the disk group capacity, but hey, nobody will yell at you for doing 20%. I also recommend the use of smaller 15K drives when possible in a Virtual SAN for VDI, since they can handle more IO per spindle, which fits better with linked clones. Need more IO? Time for another disk group per host and/or faster disk. Big picture? You don’t want to dance with the line of “enough versus not enough storage performance” to meet the requirements in a VDI. Size appropriately in accordance with your desktop assessment, beat it up in pre-prod and record performance levels before users are on it. Or else they’ll beat you up.

Assumption #3: You will be handling N+1 with another server not pictured

In the configuration used, N+1 is not accounted for. Per the norm in most reference architectures, it’s taken straight to the limit without thought for failure or maintenance. 800 desktops, 8 hosts. The supported maximum is 100 Desktops/Host on Virtual SAN due to the maximum amount of objects supported per host (3000) and the amount of objects and linked clones generate. So while you can run 800 desktops on 8 hosts, you are officially at capacity. It is noted that several failure techniques were demonstrated in the reference, however the failure of an entire host was not one of them. Simulated failure of SSD Disk, magnetic disk and network were tested but an entire host failure was not simulated.

Recommendation: Size for at least N+1. Ensure you’re taking 10% of the pCores away when running your pCores/vCPU consolidation ratios for desktops to account for the 10% Virtual SAN CPU overhead. Ensure during operational design validation that the failure of a host including a data resync does not increase disk workload in such a fashion that it negatively impacts the experience. In short, power off a host in the middle of a 4 hour View Planner run and watch the vsan.observer for disk latency one hour later during the resync.

Assumption #4: Default policy of FTT=0 for Linked Clones is Acceptable

I disagree with the mindset that FTT=0 is acceptable for linked clones. In my opinion it provides a low quality configuration as the failure of a single disk group can result in lost virtual desktops. The argument in favor of FTT=0 for stateless desktops is “So what? If they’re stateless, we can afford to lose the linked clone disks, all the user data is stored on the network!” Well that’s an assumption and a fairly large shift in thinking especially when trying to pry someone away from the incumbent monolithic array mentality. The difference here is that the availability of the storage on which the desktops reside is directly correlated with the availability of the hosts. If one of the hosts restarts unexpectedly, with FTT=0 the data isn’t really lost, just unavailable while the host is rebooting. However if a disk group suffers data loss, it makes a giant mess of a large number of desktops that you end up having to clean up manually, since the desktops are unable to be removed from the datastore in an automated fashion by View Composer. There’s a reason the KB which describes how to clean up orphaned linked clone desktops is complete with two YouTube videos. This is something I’ve unfortunately done many times, and wouldn’t wish upon anyone. Another point of design concern is that if we’re going to switch the linked clone storage policy from FTT=0 to FTT=1, now we’re inducing a more IO operations which must be accounted for across the cluster during sizing. Another point of design concern is that without FTT=1, the loss of a single host will result in some desktops that get restarted by HA, but also some that may only have their disk yanked. I would rather know for certain that the unexpected reboot of a single host will result only in the state change of desktops located on that host, not a state change of some desktops and the storage availability for others called into question. The big question I have in regards to this default policy is: Why would anyone move to a model that introduces a SPOF on purpose? Most requirements dictate removal of SPOFs wherever possible.

Recommendation: For the highest availability, plan for and utilize FTT=1 for both linked clone and full desktops when using Virtual SAN.

The default linked clone storage policy is pictured below as installed with Horizon View 6.

FTT0LC

Assumption #5: You’re going to use CBRC and have accounted for that in your host sizing

Recommendation: Ensure that you take another 2GB of memory off each host when sizing to allow for the CBRC (content based read cache) feature to be enabled.

That’s all I got. No disrespect is meant to the team of guys that put that doc together, but some people read those things as the gold standard when in reality:


Guidelines

AppVolumes is the Chlorine for your Horizon View Pools

Actual things I’ve said:

“So, you have 32 different pools for 400 people?”

“So, you have one full virtual for every employee worldwide?”

When I’ve said these things or things like it, I usually get the Nicholas Cage look back, like “DUDE I KNOW…It’s not like I had a choice”

It seems that plenty of folks have had the same problem of pool sprawl due to application compatibility issues, or things they were unable to script or work around. Having been in delivery in the virtual desktop space means that I have seen and lived with the problems of a stateless desktop environment, most of which can be overcome with some time, energy and willingness to script. Most of these obstacles are profile related, and can be easily mopped up with third party tools, but the focus of this post is what happens if we stay inside the VMware product suite without any third party extras. So the main painpoints that remain apart from profile and application setting abstraction are:

  • What happens if a user legitimately needs to install their own apps, they want it to persist on the local drive for best performance, and they’re already using a stateless desktop?
  • How can we consolidate as many users into the same desktop pool as possible without application dependency contention?
  • How can we granularly control and minimize risk during locally installed application updates? Also, how can we do it faster?

What ends up happening to most organizations is that we end up getting bacteria-like applications which cause admins to create separate pools or put a user on a full virtual. The VDI admins often times end up getting torqued at the “fringe apps” that are not central to the core business but still need to run in the virtual desktops. This is usually due to the fact that there are more use cases in a department than are initially guessed. A good example is when a Marketing department is actually 4 different use cases rather than 1 due to crazy one-off app requirements. Along those lines, these are some of the problems I’ve seen with some of the fringe “problem child” applications:

  • No support for AppData redirection
  • Large application in size which drives poor performance on network share or when virtualized
  • Vendor requires locally installed application
  • Apps that require multiple conflicting dependencies such as verisons Microsoft Office or Office Templates
  • Apps that require weekly or monthly updates that users don’t want to have to perform only once per interval (and View admins certainly don’t want to recompose for, ugh)
  • Security requirements that dictate applications cannot be installed for users that need them installed, even if locking them down another way is available.
  • Countless “one-off” applications that will not virtualize, sequence or otherwise be delivered unless they are locally installed

Let’s take a look at an image from the vmware.com AppVolumes page which clearly illustrates the difference between a locally installed or streamed from the network or remotely hosted application.

vmw-dgrm-app-volumes-overview-101

While AppVolumes won’t kill the bacteria in your swimming pool, it will most certainly allow you to clean and clear up your View pools and pave the way to a single golden image dream with instant and simple application delivery along with much cleaner and safer update methods with a faster rollback. It will mean that the only legitimate need to create a new pool is for resource differences in the VM containers themselves, and the golden images themselves will mostly likely have no apps installed locally in it. This is absolutely FANTASTIC. Under the covers, what’s really happening is that the applications and settings are being captured to a VMDK which is mounted to the capture machine, then the application is installed to it. It’s sealed, and then disconnected and hot added to multiple VMs simultaneously. The craziest part of this whole method of updating the installed applications means that you almost never have to kick a user out of their VM. However in the software as is, you have to unpresent the AppStack, then re-present the updated version during an update, so it’s a not an entirely seamless AppStack update procedure, but it’s a heck of a lot better than dealing with a recompose that impacts more departments than it needs to due to the use of a COE pool (common operating environment) which I and others preach when using stateless desktops use cases. Once I get some hands on with the product I’ll know more about the update procedure and will write about it for sure, but apparently it’s been a pretty hard to get hands on even for partners.

So what does this mean looking forward? It means that you can crack open a can of Happy New Year 2015, and start fresh. REALLY. Fresh. It’s the opportunity to start with a clean slate and keep it clean as a whistle, while maintaining persistent user installed applications, per department applications, and one off applications. Not to mention if you own Horizon Enterprise, you will get AppVolumes for free out of the gate! Cheers to that!

I’m going to try to start a new App Volumes themed blog post series for those like myself waiting for Cloud Volumes to become GA. The following are some of the topics I’d like to write on. If you’d like to hear one of them, please sound off in the comments, it’s a good source of motivation. : )

  1. Optimize Your Windows Base Image Like a Boss
  2. AppVolumes: Best Practices for AppStacks and Updating
  3. AppVolumes compared with RDSH for One-Off Application Delivery
  4. A Real World Plan for Migrating to AppStacks from Traditional LC Pools