
The goal of this blog post is to show you how to navigate through a Horizon 6 upgrade procedure. This upgrade procedure takes you through the upgrade I will have performed in my lab, from Horizon View 5.2 to Horizon View 6.0.
Upgrading to Horizon View 6 – Part 1 – Prepwork
Upgrading to Horizon View 6 – Part 2 – View Composer
Upgrading to Horizon View 6 – Part 3 – Connection Servers
Upgrading to Horizon View 6 – Part 4 – Security Servers
Upgrading to Horizon View 6 – Part 5 – Desktops
The first part of any upgrade is the prepwork.
First, go read this VMware provided upgrade guide. It is the long version of what I’m going to write below.
- Healthcheck and remedy your environment.
- Look for and clean up any problem desktops
- Visit the dashboard and check for any red marks, investigate and remediate
- Look for any desktops stuck deleting or orphaned replica VMs and clean them up
- Ensure that all pools are currently provisioning OK
- Ensure certificates are installed properly and that connections function as intended
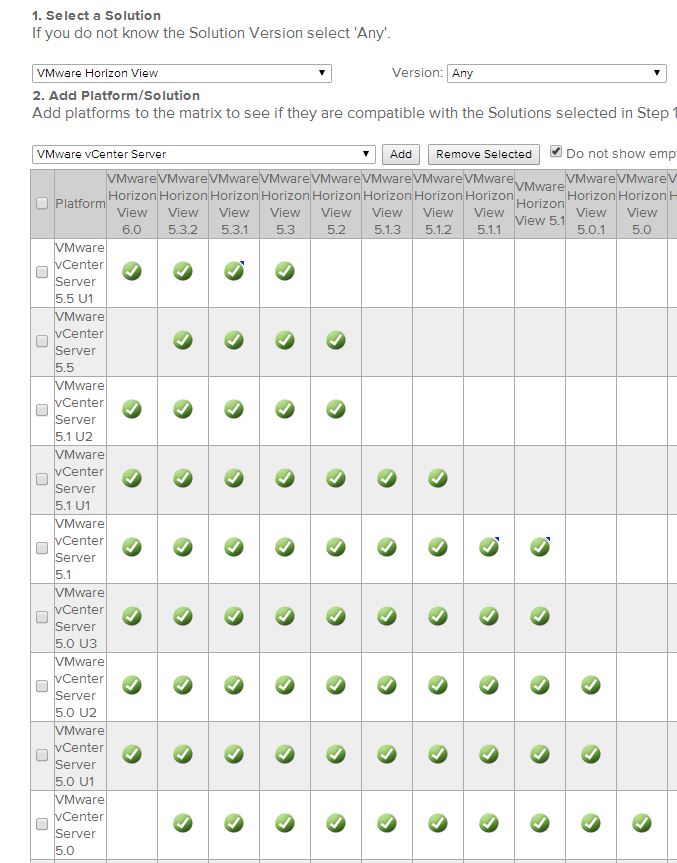
- Take note of your vCenter and ESXi version levels. Make sure they’re supported with 6.0 on the interop matrix. Here is a screen shot from present day (click opens in new tab)

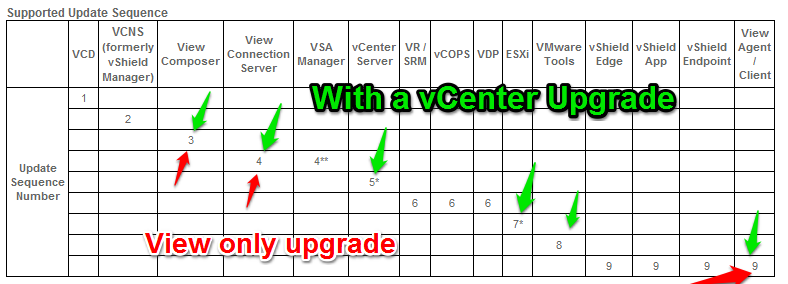
- If you require a vCenter or ESXi update make sure to visit this KB page, which lays out the update sequence, which is pretty critical during the upgrade phase. Here’s what you should expect if you’re doing a View only upgrade versus a View and vCenter upgrade. I think the next post I do will be a vCenter and View upgrade together.

- Check your databases for compatibility with View, Events and Composer. Make sure they’re still supported on the interop (Note, 2012 SQL is now supported with Horizon View 6.0, previously 2008 R2 was the highest you could go).
- Make sure your servers are sized correctly and meet the hardware reqs. 10GB memory for connection servers and I usually recommend 4 vCPU 16GB of memory for the vCenter is composer is co-located and the environment has a chance of going bigger than 500 computers.
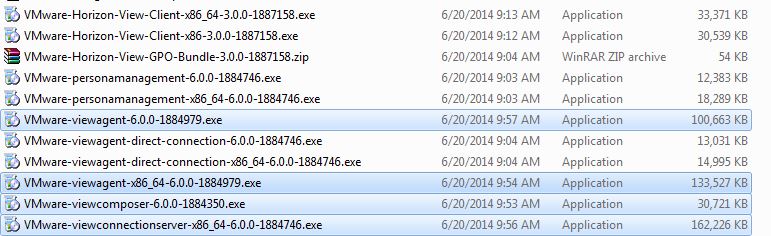
- Download the binaries and make sure they’re downloaded with the MD5 hashes checking out AOK. The one’s we’ll actually use in this post series are highlighted below.
Prepare for View Composer Upgrade (As in you’re about to perform the upgrade)
- Verify physical requirements are met on the vCenter or standalone machine (Standalone, 2 vCPU 8GB RAM, 60GB Disk, usually recommended, 4 vCPU 16GB memory for vCenter co-located composer)
- Disable provisioning on all the linked clone pools
- If any pools are set to refresh on logoff, change them to Never.
- Grab a copy of all the SSL certs ( at %ALLUSERSPROFILE%\Application Data\VMware\VMware VirtualCenter)
- Stop the View Composer service and backup the View Composer Database
- Stop the vCenter service and backup the vCenter Databases
- Snapshot the vCenter and/or standalone Composer VM(s)
- Start the vCenter service
- Start the View Composer service
Prepare for View Connection Servers (As in you’re about to perform the upgrade)
- Verify your connection servers have at least 2 vCPU (4 is recommended but I’ve seen 2 work just fine) and 10GB of RAM. You can have less, but only plan on servicing <50 desktops
- If virtual, take a snapshot of the first connection broker (we’ll revert using this guy if we absolutely have to, then uninstall and re-install the other connection brokers to re-sync back up)
- Ensure that the pools still have provisioning disabled, and navigate to C:\Program Files\VMware\VMware View\Server\tools\bin\vdmexport.exe. Create a backup of the AD-LDS Datastore by issuing the command: vdmexport > myvdmbackup.ldf
Prepare for View Security Servers (As in you’re about to perform the upgrade)
- Make sure you understand whether or not you’re using IPsec tunneling between your connection broker and and security server. Understand the implications that the Windows firewall must be running.
- In the View Administrator, select the security servers and click More Commands > Prepare for Upgrade or Reinstallation. This will disable the aforementioned IPsec rules if they are enabled.
We now have a solid failback plan for the critical components and databases and are ready to perform the composer upgrade.
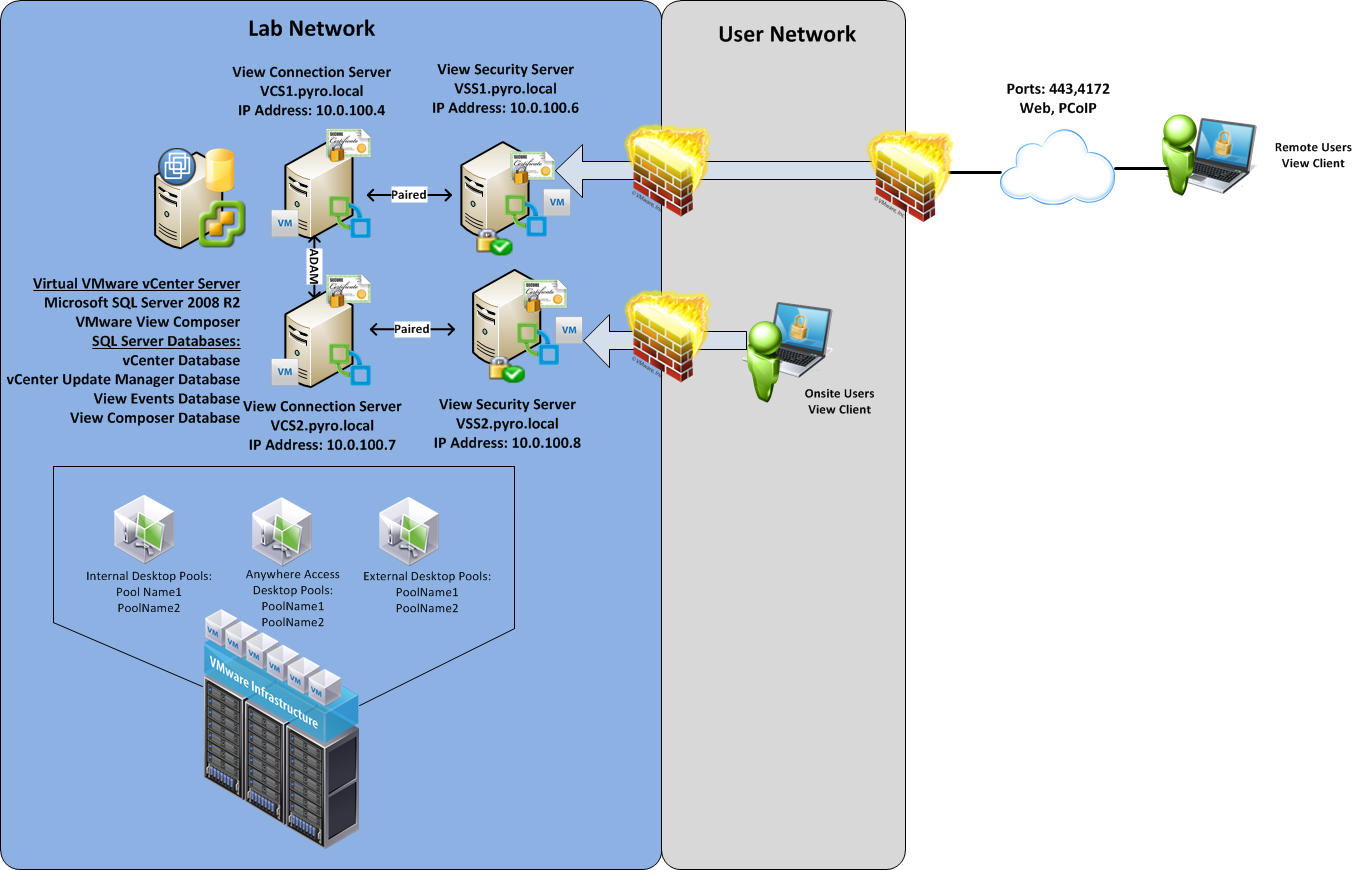
As a part of this blog post series, I will actually take you through the upgrade procedure in my lab environment. Here’s a quick look at the environment.
Next up, let’s do this!
