Speeding Up VMware View Logon Times with Windows 7 and Imprivata OneSign

Logon times are funny. It’s the first interaction that a user has with a system and they will base a lot of their opinion around the solution based on that first interaction. With a stateless VDI desktop that VMware View can provide, the user is logging onto a machine that they’ve never logged onto….every time. This creates an interesting problem. The first time you EVER log onto a PC, the experience usually stinks. It’s because your profile is being built from whatever has been defined on your box as the “default profile”, plus whatever scripts and GPOs need to be applied resulting in a 40-60 second login.

I am here to tell you today that the last few weeks of my life were dedicated to strapping a rocket to logon times with Windows 7, then adding the Imprivata solution into the mix and seeing how fast I could get logons from there. The use case that I was working with didn’t care about saving a users profile, they wanted the FASTEST VMware View logon times available no matter what it took, and Kiosk mode was not an option because user security context needed to be established. My first thought was, hey, let’s see if we can use mandatory profiles or somehow force all users to use the same profile that’s already loaded on the desktop. I was not successful with mandatory profiles or with forcing a user into a profile that was already on the machine, but during my search I was able to get connected with a Sysadmin who was able to achieve subsequent 10 second logins with Windows 7 and VMware View.

Quick breakdown on the environment I was working with: VMware View 5.1.1, ESXi 5.0, vCenter 5.0, Imprivata OneSign 4.6.

Here is what I learned during the course of my time.

  1. Windows XP is a dog. Get off it if you’re on it. You’re about to be forced to anyway, since the VMware stance is that they will not support a product that the original manufacturer itself won’t support.
  2. Establish baselines without hardware performance in the picture. If performance is an issue, troubleshoot that as well, but do it apart from your baselining. If you can’t prove what you Establish a best case for physical and virtual. Put your VDI linked clones on a flash LUN if you have one to remove the possibility of storage contention.
  3. Look at group policy and logon scripts. In my case this wasn’t the issue, but I’ve seen countless others where simply turning on asyncrhonous policy processing cut the times in half. Here’s the GPO optimization guide Microsoft has. Good stuff there. http://support.microsoft.com/kb/315418
  4. Slim and Trim down the profile. If the use case you have doesn’t need any profile data such as the desktop or documents folder? Guess what? Don’t include it.

Here are the tricks that I used to get 10 second initial logins with VMware View and Windows 7 while insuring the AppData in the profile didn’t bloat up over time and ultimately hurt login times again. Remember that in this use case, we expected that the users utilize their mapped drives to save ANY DATA that they cared about. It was understood and expected that their desktop folder and documents folder would NOT follow them around.

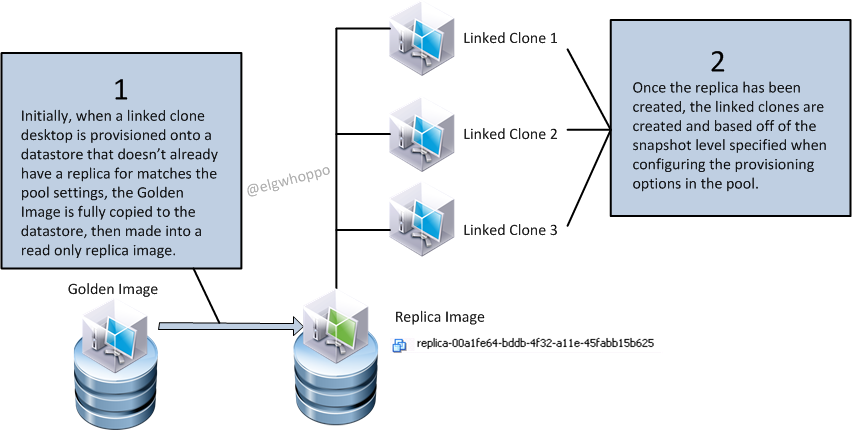
  1. We got group policy out of the equation. Machines were in a blocked OU. No loopback policy, only one GPO was utilized for the persona management configurations. Ensure that policy is processed and you log on with domain user in the golden image before building the pool. Let’s be honest, with refresh on logoff, how bad can a user mess up their PC?
  2. We used VMware View persona management and didn’t synchronize anything. I’ll go into the exact policy settings I utilized later and what I would have done if it were a requirement to keep the documents and desktop folders. Remember, we’re going for total speed here, not saving a user’s hello kitty wallpaper.
  3. Windows 7. Optimized for View following the guide. 2GB Memory. 1 vCPU. Initial logon times with a 1.75MB profile on a known good performance profile share. Consistently 15-17 second login.
  4. Windows 7. Optimized for View following the guide. 2GB Memory. 2 vCPU. Initial logon times with a 1.75MB profile on a known good performance profile share. Consistently 10 second login. This was one of the bigger performance notices. And before you go wild bumping your golden images to 2 vCPUs, make darn sure you’re aware of the impact that’s going to make on your hosts.

At this point we had a working solution with consistent 10 second logins post profile build. Now what do we do? We start layering in pieces of the solution and document logon times ONE BY ONE.

One such piece of of the solution was the Imprivata OneSign agent. We noticed that once we installed the OneSign agent MSI, the logon times went from 10 seconds to 30. Then we noticed that if for some reason we didn’t refresh that machine, subsequent logins were back to 10 seconds again. What the heck? We discovered that when you install the OneSign agent from the OneSign Appliance web page..it will automatically stuff the Trusted CA cert for the self signed cert on the Imprivata appliances into the machines local certificate store. This doesn’t happen when you install the MSI. So once we manually put the CA cert in the machines local store, we were back to 10 second logins. Another tip is to ensure that Domain Users have modify rights to C:\ProgramData\SSOProvider, as that’s where Imprivata keeps its DAT files which are regularly updated. Since users are the ones logging on, they should have full rights to that folder so they can be updated.

And so the story continues for me, layering in the solution one at a time. One pro-tip….do AV LAST. If you do it first it might have a performance impact that you’re confusing with application performance, when in fact it’s AV. Another pro-tip is to use a VDI optimized AV, such as a host based AV, or one that can scan and hash all the files in the golden image.

So here’s what you probably scrolled to the bottom to see: the list of Persona Management settings. Well here you go. We also ran into that “White start bar icons” with Windows 7, and were able to work around it by including the synchronization of the AppData\Local\IconCache.dll, along with the AppData\Roaming\Microsoft\Internet Explorer\Quick Launch folder. Pretty much everything else was excluded. If we would have wanted the Documents and Desktop folder redirected, we would have excluded them from the “Do not sync” policy, and redirected them either with native Windows policy or using the “VMware View Agent Configuration/Persona Management/Folder Redirection” section of the GPO.

If you have knowledge worker/power users that need all their documents and AppData redirected and are going to be using Linked Clones, my suggestion is to not go the persona management route, but to use a third party product such as Liquidware Labs, RES, or another suitable product. I’ve seen those two work well.

GPO Settings

VMware View Agent Configuration/Persona Management/Roaming & Synchronization

Manage User Persona: Enabled
Profile Upload interval (in minutes): 10

Persona Repository Location: \\servername\servershare\%USERNAME%\Personal
Override Active Directory Path if configured: enabled

Roam Local Settings Folders: enabled

Files and Folders Excluded from Roaming:
AppData
AppData\Local
Contacts
Desktop
Documents
Documents\My Music
Documents\My Pictures
Documents\My Videos
Downloads
Favorites
Links
My Documents\My Music
My Documents\My Pictures
My Documents\My Videos
My Music
My Pictures
My Videos
Saved Games 
Searches

Files and Folders Excluded from Roaming (exceptions):
AppData\Local\IconCache.db
AppData\Roaming\Microsoft\Internet Explorer\Quick Launch

Cisco UCS: FC port failed reason initializing, NPIV not enabled

I recently hit this and didn’t find anything rapidly on google. The configuration I was using was two Cisco MDS 9148 switches and two 6248 Cisco UCS fabric interconnects. A couple things to check if you’re getting this message:

Suspended due to NPIV is not enabled in upstream switch

ucs

And once NPIV is enabled, if the switchport goes into status:

fc port failed reason initializing

Try the following.

Thing 1: Make sure that NPIV is appropriately enabled on the switch.

Click to access npv.pdf

Thing 2: Make sure you have the VSANs configured the same in both UCS and the MDS. In this case, the storage admin I was working with created a new VSAN, but I left the UCS at the default VSAN 1.

http://www.cisco.com/en/US/docs/storage/san_switches/mds9000/sw/san-os/quick/guide/qcg_vin.html

http://www.cisco.com/en/US/docs/unified_computing/ucs/sw/gui/config/guide/2.0/b_UCSM_GUI_Configuration_Guide_2_0_chapter_010110.html

This is assuming you’re using end host mode. Hope this helps!


Move a Linked Clone View Pool to a Different Cluster with No Downtime

Happy new year all! I figured I would start off the year with a procedure I’ve used successfully to migrate View pools from one cluster to another, with completely disparate storage. One official answer from VMware when you start searching on this is a rebalance.

Migrating Linked clone pools to a different or new Datastore (1028754)

But what does a rebalance really do again? 

The best quick definition comes from the the pubs:

A desktop rebalance operation evenly redistributes linked-clone desktops among available datastores. If possible, schedule rebalance operations during off-peak hours.

So that helps us if we add new datastores to an existing cluster, but it doesn’t really help us if we need to move our stateless View environment onto new servers and storage altogether. I used this procedure with a customer recently and it worked great. I’m sure there are many other minor variations on how to do this, but this method was done purely with native commands in the View admin interface, no PowerCLI scripting required.

Here are a few important notes to keep in mind:

  • This method assumes that the linked clone desktops are completely stateless and can be refreshed without impacting end user functionality or data.
  • The new cluster must use the same vCenter server as the original pool, as Moving View-managed desktops between vCenter Servers is not supported (1018045).
  • During my testing on View 5.1.1 744999, I experienced that if you simply changed the pool configuration so that the new cluster and storage are selected, then attempt to perform a rebalance, linked clone desktops will start getting moved over before a replica is created on the new cluster, resulting in some VMs that can power on, but have no OS. This may have been a fluke during testing, but seeing it once was enough to put a bad taste in my mouth for that method.
  • If you are migrating from one cluster to another that has even slightly different build versions of ESXi, you may need a gold image update for the VMware tools and to ensure users don’t receive any unexpected hardware messages, specifically with XP. The best way I found to do this is to clone the existing gold image over to the new cluster and start a new gold image for the pool. Remember that when you clone a VM, all the snapshots will be nuked on the newly created copy of the VM, so be prepared to lose your snapshot tree if this is the case.

With those two points in mind, here is a nice visual “visio’d whiteboard session” with steps to follow that worked for me. It’s nothing really advanced, and it’s just nice to see it laid out in a manner that makes sense.

LCMigration1


Remember that before starting step three, you should have confirmed whether or not your golden image will require an update once located on the new cluster. You should also document the pool provisioning settings before starting so that they can be set back to the original parameters when finished. With step 4, the point is, you need the pool to provision at least a single new VM. So bump up your provisioning numbers or delete existing provisioned VMs to make that happen.

LCMigration2


LCMigration3

Hope this helps you fellow View administrators! All feedback, and constructive criticism are welcomed here at elgwhoppo.com, as I only care about having the correct information. See you all around and about and have a happy 2014!

How to reset administrator@vsphere.local password in vCenter 5.5

  1. Open command prompt as administrator on the SSO 5.5 server
  2. cd /d “C:\Program Files\VMware\Infrastructure\VMware\CIS\vmdird”
  3. vdcadmintool.exe
  4. Press 3 to enter the username
  5. Type: cn=Administrator,cn=users,dc=vSphere,dc=local
  6. Hit enter
  7. New password is displayed on screen
  8. Press 0 to exit

Pretty easy eh?

SSOPW


You can get to the same utility on the VCSA by logging in with root at the console and launching the following command: 

/usr/lib/vmware-vmdir/bin/vdcadmintool

Follow the same process listed above to generate a new password. 

Wireshark Network Capture Any vSwitch Traffic ESXi 5.5

So before ESXi 5.5 if we wanted to perform a packet capture natively from the ESXi box using standard switches we could only use the tcpdump-uw tool, which only allowed us to capture traffic on individual VMkernel ports. Not very useful if there’s a problem on a standard vSwitch that only has virtual machine traffic on it. With dvSwitch, we can do port mirroring and netflow, but that left the sad little standard switch outside in the bitter cold when it came time to troubleshoot non-vmkernel traffic.

Good news space heroes, released with 5.5 is the newly minted pktcap-uw tool which allows you to specify any uplink for packet capture.

For example, to capture 100 packets on on vmnic1 and output it as a pcap file into /tmp:

pktcap-uw –uplink vmnic1 –outfile /tmp/vmnic1cap.pcap -P -c 100

vmnic1

From here we can use a WinSCP or other file transfer to download the pcap file and load it into Wireshark.

pktcap-uw -h yields the help message with all usage options, including source and destination IP/mac filters.

Packet Capture and Trace command usage:
        == Create session to capture packets ==
         pktcap-uw [–capture <capture point> | [–dir <0/1>] [–stage <0/1>]]
            [–switchport <PortID> | –vmk <vmknic> | –uplink <vmnic> |
               –dvfilter <filter name>]
               –lifID <lif id for vdr>]
            [-f [module name.]<function name>]
            [-AFhP] [-p|–port <Socket PORT>]
            [-c|–count <number>] [-s|–snapLen <length>]
            [-o|–outfile <FILE>] [–console]
            [Flow filter options]
        == Create session to trace packets path ==
         pktcap-uw –trace
            [-AFhP] [-p|–port <Socket PORT>]
            [-c|–count <number>] [-s|–snapLen <length>]
            [-o|–outfile <FILE>] [–console]
            [Flow filter options]
The command options:
        -p, –port <Socket PORT>
                Specify the port number of vsocket server.
        -o, –outfile <FILE>
                Specify the file name to dump the packets. If unset,
                output to console by default
        -P, –ng   (only working with ‘-o’)
                Using the pcapng format to dump into the file.
        –console  (by default if without ‘-o’)
                Output the captured packet info to console.
        -s, –snaplen <length>
                Only capture the first <length> packet buffer.
        -c, –count <NUMBER>
                How many count packets to capture.
        -h
                Print this help.
        -A, –availpoints
                List all capture points supported.
        -F
                List all dynamic capture point functions supported.
        –capture <capture point>
                Specify the capture point. Use ‘-A’ to get the list.
                If not specified, will select the capture point
                by –dir and –stage setting
The switch port options:
(for Port, Uplink and Etherswitch related capture points)
        –switchport <port ID>
                Specify the switch port by ID
        –lifID <lif ID>
                Specify the logical interface id of VDR port
        –vmk <vmk NIC>
                Specify the switch port by vmk NIC
        –uplink <vmnic>
                Specify the switch port by vmnic
The capture point auto selection options without –capture:
        –dir <0|1>  (for –switchport, –vmk, –uplink)
                The direction of flow: 0- Rx (Default), 1- Tx
        –stage <0|1>  (for –switchport, –vmk, –uplink, –dvfilter)
                The stage at which to capture: 0- Pre: before, 1- Post:After
The capture point options
        -f [module name.]<function name>
                The function name. The Default module name is ‘vmkernel’.
                (for ‘Dynamic’, ‘IOChain’ and ‘TcpipDispatch’ capture points)
        –dvfilter <filter name>
                Specify the dvfilter name for DVFilter related points
Flow filter options, it will be applied when set:
        –srcmac <xx:xx:xx:xx:xx>
                The Ethernet source MAC address.
        –dstmac <xx:xx:xx:xx:xx>
                The Ethernet destination MAC address.
        –mac <xx:xx:xx:xx:xx>
                The Ethernet MAC address(src or dst).
        –ethtype 0x<ETHTYPE>
                The Ethernet type. HEX format.
        –vlan <VLANID>
                The Ethernet VLAN ID.
        –srcip <x.x.x.x[/<range>]>
                The source IP address.
        –dstip <x.x.x.x[/<range>]>
                The destination IP address.
        –ip <x.x.x.x>
                The IP address(src or dst).
        –proto 0x<IPPROTYPE>
                The IP protocol.
        –srcport <SRCPORT>
                The TCP source port.
        –dstport <DSTPORT>
                The TCP destination port.
        –tcpport <PORT>
                The TCP port(src or dst).
        –vxlan <vxlan id>
                The vxlan id of flow.

For more information, this KB has information.

http://kb.vmware.com/selfservice/microsites/search.do?language=en_US&cmd=displayKC&externalId=1031186